If you’re looking for a fun, meatless twist on your go-to takeout order, this crispy Asian cauliflower might just become your new obsession. It’s sticky, saucy, baked until golden, and honestly — I’ve been known to eat the whole tray straight from the baking sheet. No regrets.

I first started making this on a weeknight when I was trying to curb my sesame chicken cravings without ordering in. And let me tell you — once you taste that caramelized, savory-sweet sauce clinging to the crispy cauliflower, it’s game over.
Why You’ll Want to Make This One Over and Over
Baked, not fried – I like my kitchen mess-free, so this version skips the deep fryer but still gives you that nice, golden texture. The oven does most of the work while I clean up or prep the sauce.
Minimal dishes, quick cleanup – It’s basically one bowl for batter, one sheet pan, and a small pot for the sauce. If you line your baking tray with parchment, cleanup’s a breeze.
Crispy outside, tender inside – The texture is just right — slightly crisp on the edges, soft and flavorful inside, and once the sticky sauce hits it… magic.
It’s guilt-free takeout vibes – I love a good weekend takeaway, but my wallet and waistband don’t love it back. This homemade version is just as satisfying and comes together with pantry staples.

What You’ll Need to Make It
Here’s what I usually grab from the pantry and fridge:
-
Cauliflower – I use fresh cauliflower and cut it into small florets. Skip the frozen kind — it gets too soft and doesn’t crisp well.
-
Milk – I usually use unsweetened almond milk, but any plain, unsweetened milk works. Just avoid anything sweetened or flavored (looking at you, vanilla oat milk).
-
Flour – Regular all-purpose flour is perfect, but I’ve also tried it with gluten-free flour and even cornstarch in a pinch.
-
Salt & pepper – Just a little, because the sauce brings the flavor punch.
For the sticky sesame-style sauce:
-
Soy sauce – I use low-sodium soy sauce. If you need a soy-free option, liquid aminos or tamari works too.
-
Rice vinegar – This adds that signature tangy-sweet edge that pairs so well with roasted veggies.
-
Cornstarch – Helps thicken the sauce. Just mix it in before the sauce gets hot or it clumps up.
-
Brown sugar – For that deep, molasses-y sweetness. You could use white sugar or coconut sugar too.
-
Veggie stock – Adds a savory backbone to the sauce. I’ve used water in a pinch and it still tastes great.
-
Sesame oil – Just a small drizzle gives the sauce that rich, toasty flavor. A little goes a long way!

Let’s Get Cooking (Step-by-Step)
I’ve made this recipe more times than I can count, and here’s how I like to do it:
1. Get the oven going
Preheat your oven to 400°F (200°C). Line a baking sheet with parchment paper so nothing sticks.
2. Make the batter
In a big bowl, whisk together the flour, milk, salt, and pepper. It should be a smooth, thick-ish batter — like pancake batter but slightly thinner.
3. Coat the cauliflower
Dip each floret into the batter, give it a gentle shake to remove excess, and spread them out on the sheet. Don’t crowd them — give them breathing room.
4. Bake
Pop it into the oven for 35–40 minutes. Flip them halfway so all sides crisp up. They should be golden and slightly firm to the touch.
5. Make the sauce
While the cauliflower bakes, whisk together all the sauce ingredients in a saucepan. Heat it gently until it starts to bubble, then take it off the heat. It’ll thicken as it cools slightly.
6. Toss and serve
Once the cauliflower’s baked, toss it in a large bowl with the warm sauce until each piece is coated. Serve immediately while it’s still crispy.
A Few Handy Tips From My Kitchen
-
Cut the florets evenly – Smaller, bite-sized pieces cook more evenly and soak up the sauce better.
-
Don’t overcrowd the tray – I know it’s tempting to pile them all on one pan, but if you want that nice crisp edge, space them out. I usually use two trays or bake in batches.
-
Whisk the sauce well – Mix the cornstarch into the cold liquid before heating. Once it simmers, it thickens up quickly.
-
Add fresh garlic or ginger – Sometimes I grate in a bit of garlic or ginger while the sauce is simmering if I want more depth.
-
Garnish makes a difference – A sprinkle of sesame seeds and sliced green onions adds a nice texture and pop of color.
How I Use This Recipe in Real Life
I serve this as a weeknight dinner over rice with steamed broccoli or edamame on the side. But it’s also a hit at gatherings — even my meat-loving friends keep going back for seconds. If I’m packing lunch for the next day, I leave the sauce and cauliflower separate and toss just before eating to keep the texture right.
And yes, I’ve used this same sauce on tofu, shrimp, and even pan-seared salmon. It works every single time.
Storing Leftovers (If There Are Any!)
Fridge: Keep the cauliflower and sauce separate in airtight containers. They’ll stay good for up to 5 days. I usually store them in glass containers so I can reheat easily.
Freezer: Freeze the cauliflower and sauce separately. The cauliflower goes in a zip-top bag; the sauce in a small jar or container. They’ll last up to 6 months.
Reheat like this:
Air fryer or oven for the cauliflower (about 10 minutes at 375°F), and microwave the sauce separately until warm. Toss and enjoy — still pretty close to fresh!
If you’ve got a head of cauliflower sitting in the fridge, this recipe is a great way to use it up. Once you try this sticky, crispy version, you might never look at plain cauliflower the same way again.
Let me know how it goes for you — and if you tweak the sauce or serve it with something different, I’d love to hear!
Asian Cauliflower
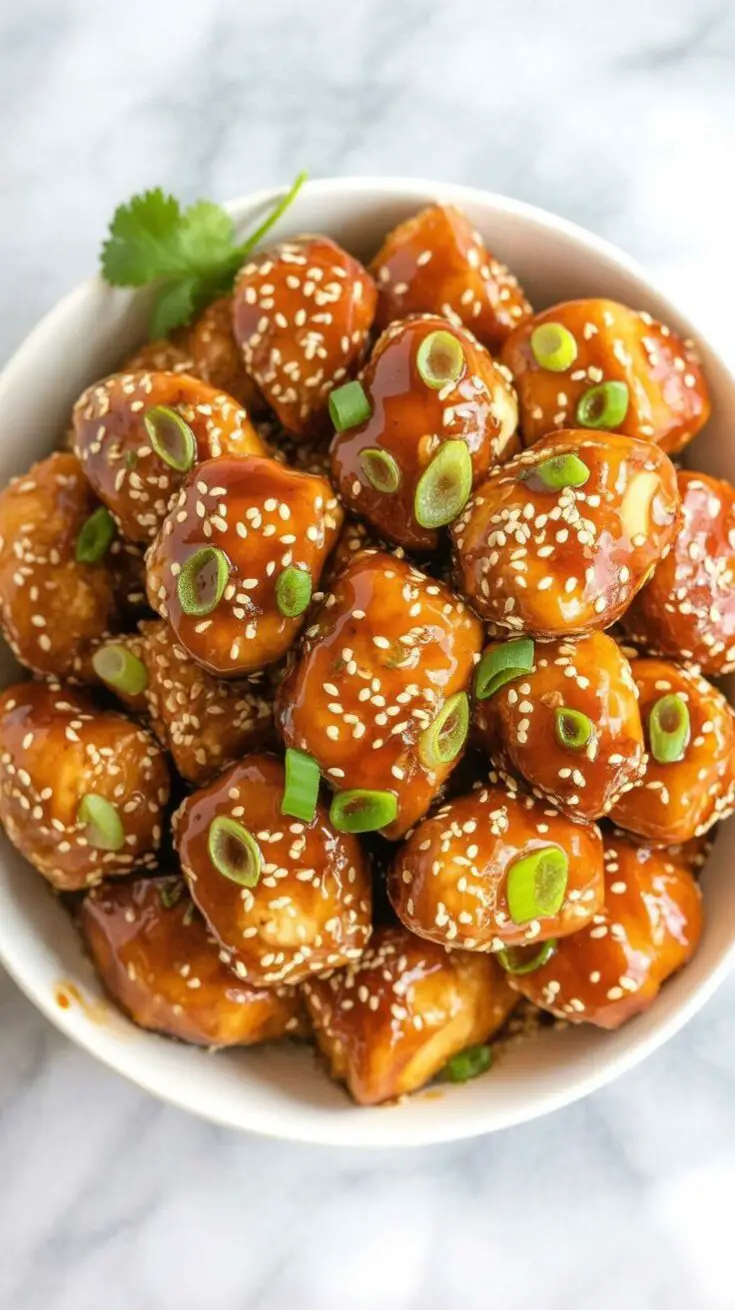
Craving a bold, crispy, and flavorful appetizer that’s a breeze to prepare? This sticky sesame Asian cauliflower promises golden, roasted crunch with a glossy, savory-sweet Chinese-inspired sauce.
Ingredients
- 1 head cauliflower, cut into bite-sized florets
- 1 cup all-purpose flour (use gluten-free if desired)
- 1 cup unsweetened almond milk (or any milk you prefer)
- 1/2 teaspoon salt
- 1/2 teaspoon black pepper
For the Sticky Sesame Sauce:
- 1/4 cup soy sauce (gluten-free if needed)
- 1/4 cup rice vinegar
- 1/3 cup vegetable broth
- 1 tablespoon sesame oil
- 1/2 cup brown sugar (or white/coconut sugar)
- 1 tablespoon cornstarch
Instructions
- Preheat oven to 400°F (200°C). Line a baking sheet with parchment paper.
- In a large bowl, whisk together flour, almond milk, salt, and pepper until smooth.
- Dip each cauliflower floret in the batter, shaking off the excess, and lay out on the prepared sheet in a single layer.
- Bake for 35–40 minutes, flipping once halfway, until the cauliflower is golden and crispy around the edges.
- While the cauliflower is baking, combine all sesame sauce ingredients in a small saucepan.
- Whisk and heat over low, bringing to a gentle simmer. Let thicken for a minute, then remove from heat.
- When the cauliflower is hot and crisp, place it in a clean mixing bowl.
- Pour the thickened sesame sauce over and gently toss to coat every piece evenly.
- Enjoy immediately for the best crunch! Garnish with sliced green onions and toasted sesame seeds if you like.
Notes
- To Store: Keep the sauce and baked cauliflower separate in the fridge for up to a week. Combine before serving.
- To Reheat: Re-crisp cauliflower in the oven or air fryer for 8–10 minutes. Warm the sauce separately and toss together just before serving.
- To Freeze: Store sauce and cauliflower separately; the sauce in a freezer-safe container and the cauliflower in a sealed bag.
Nutrition Information
Yield
4Serving Size
1Amount Per Serving Calories 293Total Fat 5gSaturated Fat 1gTrans Fat 0gUnsaturated Fat 4gCholesterol 0mgSodium 1270mgCarbohydrates 55gFiber 4gSugar 25gProtein 8g
Dinnerfocus.com, occasionally offers nutritional information for recipes contained on this site. This information is provided as a courtesy and is an estimate only. This information comes from online calculators. Although allchickenrecipes.com attempts to provide accurate nutritional information, these figures are only estimates.
Try other Cauliflower recipes:
